Segment Anything Fast
Segment Anything
Are you a purist at heart?
If so, you might want to create your own image segmentation model from scratch - have fun!
But let’s say you’re on the job, then you might be wasting your time reinventing the wheel.
In this notebook, I explore using the “FastSAM” model from Ultralytics.
What is SAM (Segment Anything Model)
The Segment Anything Model (SAM) is a promptable segmentation model – that is, the segmentation is suggestible. Give it an image coordinate or text description and it will attempt to identify the object. SAM works right out of the box – no fine-tuning necessary for many purposes. Importantly, it is license under Apache 2.0, which is an extremely permissive license.
SAM was originally developed at Meta and open-sourced on GitHub, which provides an aggressively concise description:
The Segment Anything Model (SAM) produces high quality object masks from input prompts such as points or boxes, and it can be used to generate masks for all objects in an image. It has been trained on a dataset of 11 million images and 1.1 billion masks, and has strong zero-shot performance on a variety of segmentation tasks.
A more full-bodied description from the Ultralytics website:
The Segment Anything Model, or SAM, is a cutting-edge image segmentation model that allows for promptable segmentation, providing unparalleled versatility in image analysis tasks. SAM forms the heart of the Segment Anything initiative, a groundbreaking project that introduces a novel model, task, and dataset for image segmentation.
SAM’s advanced design allows it to adapt to new image distributions and tasks without prior knowledge, a feature known as zero-shot transfer. Trained on the expansive SA-1B dataset, which contains more than 1 billion masks spread over 11 million carefully curated images, SAM has displayed impressive zero-shot performance, surpassing previous fully supervised results in many cases.
The most robust explanation and details, without actually reading the paper, can be found on Meta’s AI blog.
There is also a website dedicated to SAM, which has a nice, straight-to-the-point FAQs section.
Play around with the model using the online demo.
Learn more about it perusing some Jupyter notebooks:
- Facebook Research: Automatically generating object masks with SAM
- Roboflow
NOTE: SAM2 (link1, link2) is available now too; it works out-of-the-box on video.
FastSAM
FastSAM is basically SAM with a small tradeoff between size and accuracy.
From HuggingFace:
The Fast Segment Anything Model(FastSAM) is a CNN Segment Anything Model trained by only 2% of the SA-1B dataset published by SAM authors. The FastSAM achieve a comparable performance with the SAM method at 50× higher run-time speed.
The Chinese Academy of Sciences Image and Video Analysis (CASIA IVA) group is responsible for the development of FastSAM – a fast, accurate implementation of SAM. FastSAM provides high-performance image segmentation while optimizing for speed and ease of use. One can pip install the FastSAM model directly from their GitHub. HuggingFace provides an overview on FastSAM using this repository. Roboflow provides a much more in-depth notebook tutorial.
Ultralytics is a company that specializes in developing cutting-edge, easy-to-use, and high-performance deep learning models, particularly for computer vision tasks. They are well-known for their contributions to the YOLO (You Only Look Once) series of models. They also provide access to FastSAM through their ultralytics
package (which I use below), and provide the following tutorial.
NOTE: There is also a “faster SAM” called MobileSAM.
Environment
I’m on a Macbook. Using Conda. First, create an environment for using PyTorch.
In this notebook, I experiment with two environments because of some issues that arose, which will be outlined below.
The initial environment I created:
conda create -n ultralytics -y
conda activate ultralytics
conda install pandas seaborn jupyter -y
<!-- conda install pytorch::pytorch  -->
pip install torch ultralytics==8.2.64
pip -q install git+https://github.com/openai/CLIP.git # Ultralytics auto-installs this if you don't
The alternate environment:
conda create -n casia -y
conda activate casia
conda install pandas seaborn jupyter -y
git clone https://github.com/CASIA-IVA-Lab/FastSAM.git
pip -q install -r FastSAM/requirements.txt
pip -q install git+https://github.com/openai/CLIP.git
These two installs of FastSAM are somewhat different. Much of the code below can only run in the “ultralytics” environment I defined above. The alternate environment comes into play later when I find the initial environment’s install not behaving well.
Using ‘ultralytics’ env…
Resize the Image to 1024x1024
This is necessary to use with the FastSAM model.
from PIL import Image
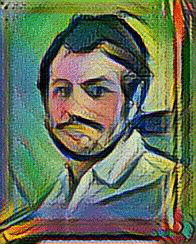
raw_image = Image.open("images/kevin.jpg")
def resize_image(image, input_size):
    w, h = image.size
    scale = input_size / max(w, h)
    new_w = int(w * scale)
    new_h = int(h * scale)
    image = image.resize((new_w, new_h))
    return image
import matplotlib.pyplot as plt
resized_image = resize_image(raw_image, input_size=1024)
plt.imshow(resized_image);

Using a CUDA GPU, MPS GPU, or CPU?
Here is some code to figure that out, and how to choose.
import torch

def get_device():
    if torch.cuda.is_available():
        device = torch.device("cuda")
        print("CUDA is available. Using GPU.")
    # Check for MPS (Apple Silicon)
    elif torch.backends.mps.is_available():
        device = torch.device("mps")
        print("MPS is available. Using Apple GPU.")
    # Default to CPU
    else:
        device = torch.device("cpu")
        print("Using CPU.")
    return device
#--
device = get_device()
device
MPS is available. Using Apple GPU.


device(type='mps')
The FastSAM Model
Note that you must have pytorch installed already. I often use Conda, but
for the ultralytics package you really need to use pip (or install from GitHub)
since the Conda Forge version is too outdated.
If you haven’t already:
pip install ultralytics
Now, this is all you need to do to get a model that detects objects, and provides their bounding boxes, segmentation boundary coordinates, and segmentation binary masks:
from ultralytics import FastSAM
model = FastSAM("weights/FastSAM-s.pt")  # or another FastSAM checkpoint
WARNING ⚠️ Ultralytics settings reset to default values. This may be due to a possible problem with your settings or a recent ultralytics package update.
View settings with 'yolo settings' or at '/Users/kevin/Library/Application Support/Ultralytics/settings.yaml'
Update settings with 'yolo settings key=value', i.e. 'yolo settings runs_dir=path/to/dir'. For help see https://docs.ultralytics.com/quickstart/#ultralytics-settings.
Detecting, bounding, and segmenting all the objects
The FastSAM model will essentially try to identify everything that appears to be a separate object.
results = model(resized_image, device=device, retina_masks=True,
                conf=0.6, iou=0.9)
/Users/kevin/mambaforge/envs/ultralytics/lib/python3.12/site-packages/ultralytics/utils/ops.py:248: UserWarning: MPS: nonzero op is supported natively starting from macOS 13.0. Falling back on CPU. This may have performance implications. (Triggered internally at /Users/runner/work/pytorch/pytorch/pytorch/aten/src/ATen/native/mps/operations/Indexing.mm:335.)
  x = x[xc[xi]]  # confidence


0: 640x480 17 objects, 328.3ms
Speed: 12.0ms preprocess, 328.3ms inference, 221.2ms postprocess per image at shape (1, 3, 640, 480)
The result is a single-element list that contains a list of Results objects.
results = results[0]
For now, let’s just look at a single Results object that we will call obj.
obj = results[1]
What do these objects contain?
Well, for one, each Results objects contains a normalized version of the original image.
import matplotlib.pyplot as plt
plt.imshow(obj.orig_img)
<matplotlib.image.AxesImage at 0x2aa987b30>

Bounding Boxes
Each Results object contains a Boxes object.
obj.boxes
ultralytics.engine.results.Boxes object with attributes:

cls: tensor([0.], device='mps:0')
conf: tensor([0.8605], device='mps:0')
data: tensor([[ 72.8459, 427.3288, 121.0991, 466.8369,   0.8605,   0.0000]], device='mps:0')
id: None
is_track: False
orig_shape: (1024, 768)
shape: torch.Size([1, 6])
xywh: tensor([[ 96.9725, 447.0829,  48.2532,  39.5081]], device='mps:0')
xywhn: tensor([[0.1263, 0.4366, 0.0628, 0.0386]], device='mps:0')
xyxy: tensor([[ 72.8459, 427.3288, 121.0991, 466.8369]], device='mps:0')
xyxyn: tensor([[0.0949, 0.4173, 0.1577, 0.4559]], device='mps:0')
import matplotlib.pyplot as plt
import matplotlib.patches as patches
def bounding_box_overlay(resized_image, results_objects, linewidth=2, edgecolor='orange',
                      alpha=1.0, first_box_color=None, first_box_line=None, ax=None):
    if first_box_color is None: first_box_color = edgecolor
    color_map = {0:first_box_color}
    if first_box_line is None: first_box_line = linewidth
    line_map = {0:first_box_line}
    if ax is None:
        fig, ax = plt.subplots(1)
    ax.imshow(resized_image)
    for idx,obj in enumerate(results_objects):
        color = color_map.get(idx,edgecolor)
        lwidth = line_map.get(idx,linewidth)
        x1, y1, x2, y2 = obj.summary()[0]['box'].values()
        w = x2-x1
        h = y2-y1
        # Create a Rectangle patch
        rect = patches.Rectangle((x1, y1), w, h, linewidth=lwidth, edgecolor=color,
                                 facecolor='none', alpha=alpha)
        ax.add_patch(rect)
bounding_box_overlay(resized_image, results, first_box_color='red')

Excursion: Overlay or Grid?
Overlays are nice, but sometimes a grid is better – e.g., for showing which bounding box comes first, second, and third.
This is also true of plotting segmentation masks and segmentation contours, so here we define a general grid plotting function that takes in an “overlay function” as an argument. (This is a use of DRY.)
def plot_grid(resized_image, results_objects, overlay_function, titles=None, n_cols=3, alpha=0.75, **kwargs):
    """
    Shows grid of result masks
    """
    n_images = len(results_objects)

    # Validation check: Ensure titles are provided and match the number of result objects
    if isinstance(titles,str): titles = [titles]
    if titles and len(titles) != n_images:
        raise ValueError("The number of titles must match the number of result objects.")

    n_rows = (n_images + n_cols - 1) // n_cols  # Calculate the number of rows needed

    fig, axs = plt.subplots(n_rows, n_cols, figsize=(n_cols * 4, n_rows * 4))
    axs = axs.flatten()  # Flatten in case of multi-row subplots

    for idx, obj in enumerate(results_objects):
        plt.sca(axs[idx])  # Set the current axes to the subplot
        overlay_function(resized_image, obj, alpha=alpha, ax=axs[idx], **kwargs)  # Use the provided function
        axs[idx].axis('off')  # Optional: turn off axis labels
        if titles:
            axs[idx].set_title(titles[idx], fontsize=10)

    # If there are more subplots than images, hide the unused subplots
    for idx in range(n_images, n_rows * n_cols):
        axs[idx].axis('off')

    plt.tight_layout()
    plt.show()
Grid of Bounding Box Plots
def bounding_box_grid(resized_image, results_objects, titles=None, n_cols=3, **kwargs):
    plot_grid(resized_image, results_objects, bounding_box_overlay, titles=titles, n_cols=n_cols, **kwargs)
bounding_box_grid(resized_image, results[:3], edgecolor='red')

Ok - How to get at an object you care more about?
Notice how the first bounding box is around a window? Do we care about that specific window? Do we care about windows at all?
What if we want to automate a script that finds the most prominent object in the image? Or we want to take more control over what is considered the first bounding box in the list of object detections?
Spoiler Alert: You can use FastSAM’s text prompting ability.
But let’s forget that exists for a moment! Let’s use what we already have on hand…
The results list above, by default, is organized by the confidence score of the bounding box.
conf = torch.tensor([],device=device)
for ooo in results:
    conf = torch.cat((conf,ooo.boxes.conf))
conf[:10]
tensor([0.8791, 0.8605, 0.8295, 0.8271, 0.8193, 0.8051, 0.8028, 0.7838, 0.7687, 0.7668], device='mps:0')
Are there other ways to order this list?
Sure! For example, if we assume that the most important object in any image is the largest object, then we can order the object detections list by area of the segmentation mask or bounding box.
area_sm = torch.tensor([]) # Area of Segmentation Masks
area_bb = torch.tensor([]) # Area of Bounding Boxes
for object in results:
    mask = object.masks.data == 1.0
    area_sm = torch.cat((area_sm, torch.tensor([mask.sum()])))
    box = object.boxes.xywh[0,2:]
    area_bb = torch.cat((area_bb, torch.tensor([box.prod()])))
#--
print("\nSegmentation Mask Areas: \n\t", area_sm[:10])
print("\nBounding Box Areas: \n\t", area_bb[:10])
Segmentation Mask Areas:
	 tensor([  2709.,   1746., 466367.,   4932.,   2890.,   2497., 108379.,   1013.,   2335.,   2778.])

Bounding Box Areas:
	 tensor([  2848.7622,   1906.3929, 707469.0000,   5894.9185,   3418.4387,   2684.7358, 194830.2500,   1178.3231,   2594.9885,   3093.6763])
We showed the mask and box areas associated with each Results object, but to actually
sort the results list by area we can use Python’s sorted with a lambda function:
area_results = sorted(results, key=lambda x: x.masks.data.sum(), reverse=True)
area_results_bb = sorted(results, key=lambda x: x.boxes.xywh[0,2:].prod(), reverse=True)
#--
print("\nResults objects sorted by mask area: \n\t",[result.masks.data.cpu().numpy().sum().astype(int) for result in area_results[:10]])
print("\nResults objects sorted by box area: \n\t",[result.boxes.xywh[0,2:].cpu().numpy().prod().astype(int) for result in area_results_bb[:10]])
Results objects sorted by mask area:
	 [466367, 233667, 177690, 108379, 5059, 4932, 4533, 2890, 2778, 2709]

Results objects sorted by box area:
	 [707469, 362798, 242472, 194830, 24883, 22569, 5894, 3418, 3093, 2848]
And now draw the results when reverse-sorted by mask area – top results is in red.
bounding_box_overlay(resized_image, area_results, first_box_color='red', first_box_line=5)

The first 3 objects now correspond to the human, jacket, and face.
bounding_box_grid(resized_image, area_results[:3], edgecolor='red', titles=['Human','Jacket','Face'])

It’s a bounding box around me!
Masks Objects
Each Results object also contains a Masks object, which contains the
segmentation information and a mask array for that segmentation. We used this information
above to sort the results by segmentation mask area.
The code below focuses a bit more on these Mask objects, and we create a way
to overlay the masks onto the original image.
Let’s look at the segmentation mask.
import numpy as np
def get_mask(obj):
    mask = obj.masks.data[0].to('cpu').numpy()
    return mask

def segmentation_mask_overlay(resized_image, results_objects, alpha=0.75, ax=None):
    """
    Shows result's mask if only one Results object,
    Else creates union of masks
    """
    if ax is None:
        fig, ax = plt.subplots(1)
    ax.imshow(resized_image)
    # Initialize mask
    mask = get_mask(results_objects[0])
    combined_mask = np.zeros_like(mask, dtype=bool)
    # Create mask
    for obj in results_objects:
        mask = get_mask(obj)
        combined_mask = np.logical_or(combined_mask, mask)  # Union of masks
    ax.imshow(combined_mask, alpha=alpha)

def segmentation_mask_grid(resized_image, results_objects, titles=None, n_cols=3, alpha=0.75, **kwargs):
    plot_grid(resized_image, results_objects, segmentation_mask_overlay, titles=titles, n_cols=n_cols, alpha=alpha, **kwargs)
Segmentation Mask Overlay
Sometimes you might want to combine masks. Here are the first 3 results by confidence level.
segmentation_mask_overlay(resized_image, results[:3])

Segmentation Mask Grid
Other times you might not want to combine masks. Here are the first 3 masks by bounding box area.
segmentation_mask_grid(resized_image, area_results[:3], titles=['Human','Jacket','Face'])

Segmentation Contours
def segmentation_contour_overlay(resized_image, results_objects,
        first_obj_edge='red', first_obj_face='orange', first_obj_line=3, alpha=0.5, ax=None):
    edge_map = {0:first_obj_edge}
    face_map = {0:first_obj_face}
    line_map = {0:first_obj_line}
    if ax is None:
        fig, ax = plt.subplots(1)
    ax.imshow(resized_image)
    for idx,obj in enumerate(results_objects):
        edgecolor = edge_map.get(idx,'blue')
        facecolor = face_map.get(idx,'yellow')
        linewidth = line_map.get(idx,2)
        xy = obj.masks.xy[0]
        # Create a Polygon patch
        polygon = patches.Polygon(xy, closed=True, linewidth=linewidth,
                        edgecolor=edgecolor, facecolor=facecolor, alpha=alpha)
        ax.add_patch(polygon)

def segmentation_contour_grid(resized_image, results_objects, titles=None, n_cols=3, alpha=0.5, **kwargs):
    plot_grid(resized_image, results_objects, segmentation_contour_overlay,
              titles=titles, n_cols=n_cols, alpha=alpha, **kwargs)
Here, we make an interesting use of both the overlay and grid functions.
Instead of passing a Results object containing one or more Results objects, we will pass a list of overlays we want to see on the grid.
human = area_results[0]
human_and_jacket = area_results[:2]
jacket_and_face = area_results[1:3]
overlays = [human, human_and_jacket, jacket_and_face]

segmentation_contour_grid(resized_image, overlays, titles=['Human', 'Human and Jacket', 'Jacket and Face'])

FastSAM Prompting
In the case of my selfie, sorting by area let us gain access to Results object
that is of most interest in the pic, but this is somewhat based on good luck:
the object(s) one cares about in an image will not always be identified by having
the largest area(s)!
Image Coordinates: One way to solve this is by using image coordinates, then identifying which masks contain those image coordinates. However, relying on image coordinates means that we need to know the image coordinates! In an application setting,
one way to deal with this is adding functionality that allows the user to click on the object(s) they care about. The ultralytics
package can then be used to do the rest via point-prompt processing feature.
Text Prompts: For a more programmatic automated approach, we might want something else. Text prompting would be nice!
And the ultralytics package has this functionality. Text prompting is still compatible with user interaction if
desired, but can also be used more easily in routine tasks, like an app that focuses exclusively on
cat, dog, and bird identification.
In version 8.2.65, the prompt processing features are available via the FastSAMPrompt
object, which takes a list of Results objects upon instantiation and then provides
methods for searching those results. The text_prompt method
finds the objects most closely matching the text prompt (e.g., “cat or dog or bird”).
Failed Attempt #1: Are close-Up selfies bad for FastSAM?
When I began tinkering with the ultralytics package, it was with a selfie. Little
did I know that FastSAM simply could not semantically understand such a close-up picture
of a face. Or perhaps just something is just tricky about this particular selfie. Either way:
text prompting was not working, and it was bumming me out.
I tried prompting with “person”, with “face”, with “tree”, and even with “skibbidy dee.” Each time, the model would return the same results – and it was never a person, face, tree, or skibbidy dee!
Debugging
- Figured I was doing something wrong, but I wasn’t: my code was exactly as written in the ultralytics docs.
- Blamed it on the conda installation. Made a new conda environment entirely with pip installs. Nope! Same bogus results.
- Assumed the result must be due to some mystery interaction (arising in both environments) between the ultralytics package and the fact I was running things on my Macbook (e.g., it’s not Linux, it’s not using CUDA GPUs). Could have tried using a Docker environment at this point, but instead created third conda PyTorch environment where I installed the
fastsampackage from GitHub, like in the RoboFlow tutorial:git clone https://github.com/CASIA-IVA-Lab/FastSAM.gitpip -q install -r FastSAM/requirements.txtpip -q install git+https://github.com/openai/CLIP.git
Nothing worked! What was going on?
It wasn’t the code I was using. It wasn’t the environment.
The bug was the image itself!
I found this out by recreating the environment from the RoboFlow notebook and running it on my Macbook.
Their text prompt example worked just fine! “Ok,” I thought, “Let’s run this code with my selfie.” This time it didn’t work! Same problems. So then I thought, “Ok, let me try their image example with my code in my other conda environments.”
It worked, but not in the ultralytics environment I set up. It only worked in the CASIA environment
I set up, similar to the RoboFlow environment.
The bug is also the ultralytics conda environment.
As an aside, it also became apparent how the performance of the different versions
of FastSAM compared: FastSAM.pt works much better than FastSAM-s.pt (go figure, it’s
a much bigger model!).
Failed Attempt #2: FastSAMPrompt Crashes a Few Days Later
Can’t emphasize enough how important it is to specify version numbers
on certain packages when creating environments – in this case the ultralytics package. For using text
prompts in the environment I created on July 25, from ultralytics.models.fastsam import FastSAMPrompt
worked in the version installed by pip install ultralytics (version 8.2.65). The
version installed 3 days later (8.2.68) when I recreated the environment no longer
supported this syntax.
In version 8.2.65 (July 25), one can use this code to textually prompt the model:
from ultralytics import FastSAM
from ultralytics.models.fastsam import FastSAMPrompt
model = FastSAM("FastSAM-s.pt")  # or FastSAM-x.pt
results = model(resized_image, device=device, retina_masks=True,
                conf=0.6, iou=0.9)[0]
prompt = FastSAMPrompt(resized_image, results[0], device=device)
prompt_result = prompt.text_prompt(text='person')
draw_bounding_box(resized_image, prompt_result[0])
In version 8.2.77 (Aug 13), that code doesn’t work! But this much simpler
snippet appears to do the same thing:
from ultralytics import FastSAM
model = FastSAM("FastSAM-s.pt")
results = model(resized_image, texts="person")
draw_bounding_box(resized_image, results[0])
Question: Does any of the updated ultralytics packages (8.2.68 through 8.2.77)
come with the power to text prompt my up-close selfie with “person” or “face” using FastSAM?
Answer: Nope!
For consistency with the most of this notebook/blog, I use ultralytics version
8.2.65 below to show these failed attempts.
For sanity’s sake, I put a bunch of the code and functions above into a utils package, which is used below.
Explicit Failure Details!
from utils import get_device, get_results, bounding_box_overlay
from ultralytics.models.fastsam import FastSAMPrompt

device = get_device()

fastsam_s = 'weights/FastSAM-s.pt' # downloads automatically if not there
fastsam_x = 'weights/FastSAM-x.pt' # downloads automatically if not there
fastsam_hf= 'weights/FastSAM.pt'
MPS is available. Using Apple GPU.
Failure on Selfie
# Small FastSAM and Big FastSAM Results
selfie_results_fs = get_results(resized_image, fastsam_s, device=device)
selfie_results_fx = get_results(resized_image, fastsam_x, device=device)

# Prompters
selfie_prompter_fs = FastSAMPrompt(resized_image, selfie_results_fs, device=device)
selfie_prompter_fx = FastSAMPrompt(resized_image, selfie_results_fx, device=device)

# Prompts
selfie_prompt_person_fs = selfie_prompter_fs.text_prompt(text='person')
selfie_prompt_person_fx = selfie_prompter_fs.text_prompt(text='person')
selfie_prompt_face_fx   = selfie_prompter_fs.text_prompt(text='face')
selfie_prompt_tree_fx   = selfie_prompter_fs.text_prompt(text='tree')

# Grid of Fs-vs-Fx Overlays
overlays = [selfie_prompt_person_fs, selfie_prompt_person_fx]
titles = ['Person (FastSAM-s)', 'Person (FastSAM-x)']
bounding_box_grid(resized_image, overlays, titles=titles, first_box_color='red')

# Grid of Other Fx Overlays
overlays = [selfie_prompt_face_fx, selfie_prompt_tree_fx]
titles = ['Face (FastSAM-x)', 'Tree (FastSAM-x)']
bounding_box_grid(resized_image, overlays, titles=titles, first_box_color='red')
0: 1024x768 18 objects, 407.5ms
Speed: 7.0ms preprocess, 407.5ms inference, 182.3ms postprocess per image at shape (1, 3, 1024, 768)

0: 1024x768 24 objects, 430.2ms
Speed: 3.1ms preprocess, 430.2ms inference, 354.8ms postprocess per image at shape (1, 3, 1024, 768)


Failure on Roboflow Dog
Below I use very similar code to above, but modified to analyze the Roboflow dog. Also, instead
of explicitly showing all the code again, I call a wrapper function I wrote from my utils library.
from utils import get_raw_image, get_prompt_results

img = get_raw_image('images/roboflow-dog.jpeg')
prompts = ['cap','dog','bag','building']
# prompt_results_fs = get_prompt_results(img, 'weights/FastSAM-s.pt', prompts)
# prompt_results_fx = get_prompt_results(img, 'weights/FastSAM-x.pt', prompts)
prompt_results_hf = get_prompt_results(img, fastsam_hf, prompts) # Weights from RoboFlow notebook / HuggingFace

# Grid of Fs Overlays
overlays = prompt_results_hf
titles = ['Cap (FastSAM-s)', 'Dog (FastSAM-s)',  'Bag (FastSAM-s)',  'Building (FastSAM-s)']
bounding_box_grid(img, overlays, titles=titles, n_cols=4, first_box_color='red')

I tinkered with this for a while but didn’t get it to work. I did get some things to work in the CASIA environment below, but at the expense of not being able to use the overlay and grid plotting functions I designed above.
CASIA Environment
- NOTE: I had to modify FastSAM/fastsam/prompt.py: had to add “import clip” at the top
- Prompt outputs are numpy arrays instead of Results objects, so my plotting functions do not work
- The code below will not work in the ultralytics environment above
# Had to modify `prompt.py` file -- "import clip"
import matplotlib.pyplot as plt
from PIL import Image
import os
import sys
sys.path.insert(1,f'{os.getcwd()}/FastSAM')
#--
from fastsam import FastSAM, FastSAMPrompt
#--
import utils_casia
from importlib import reload; reload(utils_casia)
from utils_casia import resize_image, get_raw_image, get_device, get_results
#--
device = get_device()
fastsam_s = 'weights/FastSAM-s.pt'
fastsam_x = 'weights/FastSAM-x.pt'
MPS is available. Using Apple GPU.
def get_prompt_process(image_path, model, device=None, retina_masks=True, imgsz=1024, conf=0.5, iou=0.6):
    image = get_raw_image(image_path)
    results = get_results(image, model, device=device, retina_masks=retina_masks,
                          imgsz=imgsz, conf=conf, iou=iou)
    prompt_process = FastSAMPrompt(image, results, device=device)
    return prompt_process

def get_prompt_result(prompt_process, text):
    prompt_results = prompt_process.text_prompt(text=text)
    return prompt_results
Success with the RoboFow Dog Pic
dog_prompter_fs = get_prompt_process('images/roboflow-dog.jpeg', fastsam_s, device=device)
fig, axs = plt.subplots(1, 2, figsize=(8, 4))
axs = axs.flatten()  # Flatten in case of multi-row subplots
plt.sca(axs[0])  # Set the current axes to the subplot
plt.imshow(get_prompt_result(dog_prompter_fs,'cap')[0])
plt.sca(axs[1])  # Set the current axes to the subplot
plt.imshow(get_prompt_result(dog_prompter_fs,'building')[0]);
0: 1024x576 24 objects, 126.1ms
Speed: 11.2ms preprocess, 126.1ms inference, 51.3ms postprocess per image at shape (1, 3, 1024, 1024)


<matplotlib.image.AxesImage at 0x28e5d5970>

Bigger model does slightly better.
dog_prompter_fx = get_prompt_process('images/roboflow-dog.jpeg', fastsam_x, device=device)
fig, axs = plt.subplots(1, 2, figsize=(8, 4))
axs = axs.flatten()  # Flatten in case of multi-row subplots
plt.sca(axs[0])  # Set the current axes to the subplot
plt.imshow(get_prompt_result(dog_prompter_fx,'cap')[0])
plt.sca(axs[1])  # Set the current axes to the subplot
plt.imshow(get_prompt_result(dog_prompter_fx,'building')[0]);
0: 1024x576 30 objects, 441.1ms
Speed: 3.9ms preprocess, 441.1ms inference, 134.8ms postprocess per image at shape (1, 3, 1024, 1024)


<matplotlib.image.AxesImage at 0x2869d2720>

Success with Random Internet Kitty
cat_prompter_fx = get_prompt_process('images/kitty.png', fastsam_x, device=device)
fig, axs = plt.subplots(1, 2, figsize=(8, 4))
axs = axs.flatten()
plt.sca(axs[0])
plt.imshow(get_prompt_result(cat_prompter_fx,'cat')[0])
axs[0].set_title("Cat")
plt.sca(axs[1])
plt.imshow(get_prompt_result(cat_prompter_fx,'bush')[0])
axs[1].set_title("Bush");
0: 736x1024 21 objects, 202.5ms
Speed: 5.4ms preprocess, 202.5ms inference, 12.5ms postprocess per image at shape (1, 3, 1024, 1024)

Failure on Selfie!!!
slf_prompter_fx = get_prompt_process('images/kevin.jpg', fastsam_x, device=device)
fig, axs = plt.subplots(1, 2, figsize=(8, 4))
axs = axs.flatten()
plt.sca(axs[0])
plt.imshow(get_prompt_result(slf_prompter_fx,'face')[0])
axs[0].set_title("Face")
plt.sca(axs[1])
plt.imshow(get_prompt_result(slf_prompter_fx,'button')[0])
axs[1].set_title("Button");
0: 1024x768 27 objects, 224.7ms
Speed: 9.3ms preprocess, 224.7ms inference, 31.3ms postprocess per image at shape (1, 3, 1024, 1024)
